Mushroom pinning is the stage where tiny mushroom primordia appear after the mycelium fully colonizes the substrate. This phase signifies the start of mushroom fruiting.
Mushroom pinning is a crucial stage in mushroom cultivation. It indicates that the growing conditions are ideal for fruiting. Growers often monitor temperature, humidity, and light to encourage pinning. Proper airflow is also essential to prevent contaminants. The appearance of tiny pins signals that the mycelium is healthy and ready to produce mushrooms.
Cultivators must maintain optimal conditions to ensure successful growth. This stage requires careful attention to detail. Successful pinning leads to a bountiful mushroom harvest, making it a key focus for mushroom growers. Understanding the pinning process can significantly enhance cultivation results.
The Magic Of Mushroom Pinning
Mushroom pinning is a fascinating stage in mushroom cultivation. This stage reveals the tiny mushrooms, also known as pins. These pins are the first sign that your mushrooms are growing. Understanding this stage can help you grow healthier mushrooms.
What Is Mushroom Pinning?
Mushroom pinning happens when the mycelium starts forming tiny mushrooms. These tiny mushrooms are called pins. Pins look like little dots on the substrate. This stage is crucial for mushroom growers.
The Lifecycle Of Mushrooms
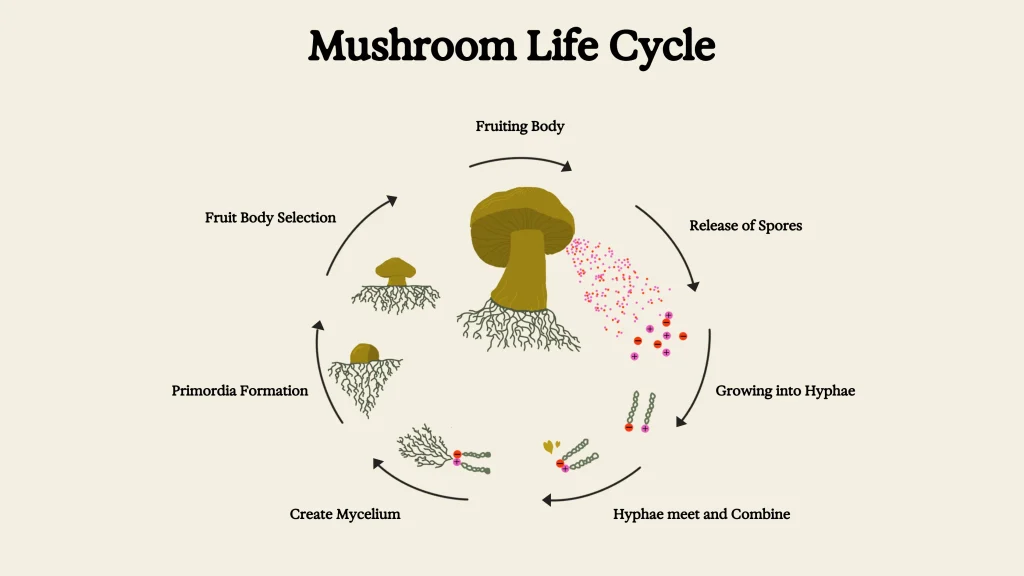
Mushrooms go through a unique lifecycle. Understanding this cycle helps in successful cultivation. Here’s a simple breakdown:
| Stage | Description |
|---|---|
| Spore | Spores are tiny, dust-like particles. They spread to new areas. |
| Germination | Spores germinate, forming thread-like cells called hyphae. |
| Mycelium | Hyphae grow and combine to form a network, known as mycelium. |
| Pinning | Mycelium forms small mushroom pins. This is the start of mushroom formation. |
| Fruiting | Pins grow into mature mushrooms, ready for harvest. |
Each stage is important for growing healthy mushrooms. Knowing about these stages helps in the cultivation process.

Ideal Conditions For Mushroom Growth
Growing mushrooms requires specific conditions. Mushrooms need the right environment to thrive. Temperature, humidity, light, and air exchange play a crucial role.
Temperature And Humidity
Mushrooms need a controlled temperature to grow well. The ideal range is usually between 65°F to 75°F (18°C to 24°C). Too hot or too cold can harm growth.
Humidity is also vital. Mushrooms love moist environments. The ideal humidity level is between 85% and 95%. This helps them stay hydrated and grow properly.
| Condition | Ideal Range |
|---|---|
| Temperature | 65°F to 75°F (18°C to 24°C) |
| Humidity | 85% to 95% |
Light And Air Exchange
Light is essential but in moderation. Mushrooms do not need direct sunlight. Indirect or low light is sufficient. Around 12 hours of light and 12 hours of darkness works well.
Air exchange is crucial for mushroom growth. Fresh air prevents harmful CO2 buildup. Ensure proper ventilation to maintain a healthy environment. A balance of fresh air and humidity is key.
- Indirect or low light
- 12 hours of light and darkness
- Proper ventilation
By maintaining these ideal conditions, your mushrooms will flourish. Follow these guidelines for healthy and abundant growth.
Substrate Selection And Preparation
Choosing the right substrate is crucial for successful mushroom pinning. The substrate provides nutrients for mushrooms to grow. Proper preparation ensures healthy and abundant mushrooms. Let’s dive into the details.
Types Of Substrates
Different mushrooms prefer different substrates. Here are some common types:
- Straw: Good for Oyster mushrooms.
- Sawdust: Suitable for Shiitake mushrooms.
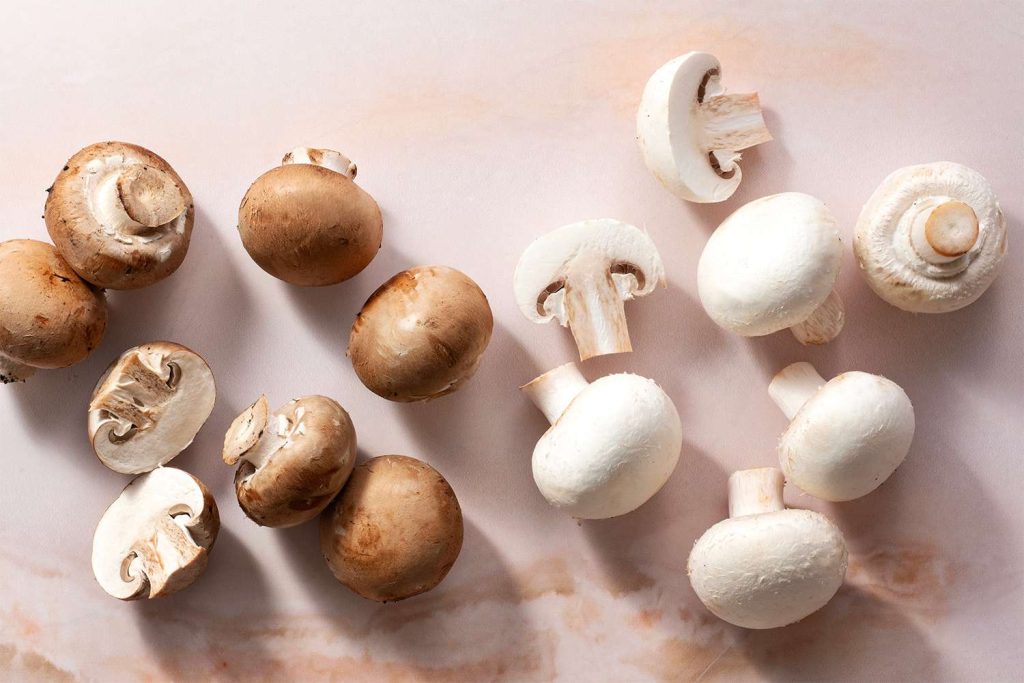
- Compost: Ideal for Button mushrooms.
- Coffee Grounds: Great for many mushrooms.
Choose a substrate based on the mushroom type. This ensures better growth and yield.
Preparing Your Substrate
Proper preparation of the substrate is essential. Follow these steps:
- Pasteurization: Heat the substrate to kill harmful organisms.
- Moisture Content: Ensure the substrate is moist but not soggy.
- Mixing: Evenly mix the substrate with mushroom spawn.
These steps help create an ideal environment for mushrooms to pin. Use clean tools to avoid contamination.
Here is a simple table to guide you:
| Substrate | Best for Mushroom | Preparation Method |
|---|---|---|
| Straw | Oyster | Pasteurize, Moist, Mix |
| Sawdust | Shiitake | Pasteurize, Moist, Mix |
| Compost | Button | Pasteurize, Moist, Mix |
| Coffee Grounds | Various | Pasteurize, Moist, Mix |
Following these guidelines will help you achieve successful mushroom pinning. Remember, cleanliness is key in every step.
Inoculation Techniques
Mushroom pinning is an exciting phase in mushroom cultivation. To reach this phase, inoculation techniques play a crucial role. These methods help introduce mushroom spores or mycelium to a suitable substrate. Let’s explore some key techniques used for inoculation.
Spore Syringes And Liquid Cultures
Spore syringes are a common method for inoculation. They contain mushroom spores suspended in sterile water. Growers use a needle to inject these spores into the substrate. This method is simple and effective.
Liquid cultures, on the other hand, contain live mycelium in a nutrient-rich liquid. This method speeds up the colonization process. Growers often prefer liquid cultures for faster results. Both methods require sterile conditions to avoid contamination.
| Spore Syringes | Liquid Cultures |
|---|---|
| Contains spores in water | Contains live mycelium in liquid |
| Slower colonization | Faster colonization |
| Easy to use | Requires careful handling |
Grain-to-grain Transfers
Grain-to-grain transfers are another effective inoculation technique. This method involves transferring colonized grain to a new batch of sterile grain. It helps expand the mycelium quickly.
This method is efficient and cost-effective. It requires a sterile environment to prevent contamination. Growers often use a flow hood or glove box for this process.
Here are the steps for grain-to-grain transfers:
- Prepare sterilized grain jars.
- Open a colonized grain jar in a sterile environment.
- Scoop some colonized grain with a sterile spoon.
- Transfer it to the new sterilized grain jars.
- Seal the jars and incubate them.
This method is popular among experienced growers. It allows for rapid expansion and efficient use of resources.
Creating The Perfect Environment
For successful mushroom pinning, it’s crucial to create the perfect environment. This includes managing humidity, temperature, and lighting conditions. Let’s explore each of these essential factors in detail.
Controlling Humidity
Mushrooms need high humidity to pin properly. Aim for a humidity level of 90-95%. Use a hygrometer to monitor the humidity levels in your growing area. If the humidity drops, mist the area with water. Ensure proper ventilation to prevent mold growth.
Maintaining Temperature
The ideal temperature for mushroom pinning is between 60-65°F (15-18°C). Use a thermometer to check the temperature regularly. If the temperature is too high or too low, adjust the heating or cooling in the room. Avoid direct heat sources, as they can dry out the mushrooms.
Lighting Conditions
Mushrooms require light to begin pinning. Provide indirect light for 12 hours a day. Avoid direct sunlight, which can be too intense. Use a grow light if natural light is insufficient. Ensure the light source is consistent to promote even growth.
| Factor | Optimal Range |
|---|---|
| Humidity | 90-95% |
| Temperature | 60-65°F (15-18°C) |
| Lighting | 12 hours indirect light daily |
By controlling these key factors, you can create the perfect environment for mushroom pinning.
Monitoring And Adjusting Conditions
Monitoring and adjusting conditions are crucial for successful mushroom pinning. Small changes can impact growth stages. Pay attention to humidity, temperature, and airflow. These factors ensure a healthy environment for mushrooms.
When To Adjust Humidity
Humidity plays a key role in mushroom pinning. Aim for 85% to 95% humidity. Use a hygrometer to measure humidity levels. Adjust if it falls below or rises above the target range.
| Humidity Level | Action |
|---|---|
| Below 85% | Increase Humidity |
| 85% – 95% | Maintain Current Level |
| Above 95% | Decrease Humidity |
Temperature Tweaks
The ideal temperature range for mushroom pinning is 65°F to 75°F. Use a thermometer to monitor the temperature. Adjust heating or cooling devices as needed.
- Below 65°F: Use a heater to raise temperature.
- 65°F to 75°F: Maintain current temperature.
- Above 75°F: Use fans or AC to cool down.
Airflow Adjustments
Proper airflow is essential for mushroom pinning. It prevents mold and provides fresh air. Use fans to circulate air. Ensure the growing area is ventilated but not drafty.
- Check for stagnant air.
- Place small fans in the growing area.
- Ensure fresh air exchange without strong drafts.
Harvesting Your Mushrooms
Harvesting mushrooms is an exciting part of mushroom pinning. Knowing the right time and techniques is crucial. This ensures you get the best yield and flavor from your mushrooms.
Signs They’re Ready
Recognizing the signs of readiness is essential. Here are the key indicators:
- Cap Size: The caps should be fully open.
- Gills Exposure: Gills should be visible underneath the cap.
- Color Change: The color should be vibrant and consistent.
- Stalk Firmness: Stalks should feel firm to the touch.
Harvesting Techniques
Using the right techniques ensures a clean harvest:
- Gently twist the mushroom at the base.
- Pull up slowly to avoid breaking the stalk.
- Use a clean knife for stubborn mushrooms.
- Place harvested mushrooms in a basket.
| Technique | Tools Needed | Best For |
|---|---|---|
| Twisting | None | Most Mushrooms |
| Cutting | Clean Knife | Stubborn Mushrooms |
After harvesting, store your mushrooms in a cool, dry place. This helps maintain their freshness and flavor.
Troubleshooting Common Issues
Growing mushrooms can be tricky. Sometimes, problems arise during the pinning stage. This guide helps you solve common issues. Let’s ensure your mushroom journey is smooth and fruitful.
Contamination
Contamination is a big problem. It can ruin your mushroom crop. Watch for unusual colors like green, black, or pink. These colors mean mold or bacteria. Use a clean workspace to prevent contamination. Sterilize tools and surfaces regularly.
Here are some tips to avoid contamination:
- Use gloves and a mask when handling mushrooms.
- Wipe surfaces with alcohol or bleach.
- Keep your grow area well-ventilated.
If you spot contamination, remove the affected areas. Isolate them from healthy mushrooms. Be quick to prevent the spread.
Stalled Growth
Stalled growth is frustrating. Your mushrooms stop developing. Check the temperature first. Mushrooms need the right temperature to grow. Keep it between 65°F and 75°F.
Here is a table for ideal conditions:
| Factor | Ideal Range |
|---|---|
| Temperature | 65°F – 75°F |
| Humidity | 80% – 90% |
| Light | Indirect |
Check humidity too. It should be high, around 85%. Mist your mushrooms if needed. Provide indirect light. Mushrooms grow in low light conditions.
Uneven Pinning
Uneven pinning happens when mushrooms grow at different rates. This can be due to uneven conditions. Ensure all parts of your grow area are the same.
Follow these steps for even pinning:
- Rotate your grow containers daily.
- Mist evenly across the surface.
- Check for drafts or temperature changes.
Keep a close eye on your mushrooms. Adjust conditions as needed. Consistency is key for even pinning.
Frequently Asked Questions
What Is Mushroom Pinning?
Mushroom pinning is the stage where tiny mushroom formations, known as pins, start to appear. This is an early indicator of successful mushroom cultivation.
How Long Does Pinning Take?
Pinning typically takes 7-14 days, depending on the mushroom species and growing conditions. Proper humidity and temperature are crucial for timely pinning.
What Triggers Mushroom Pinning?
Mushroom pinning is triggered by changes in humidity, temperature, and light. Adequate fresh air exchange is also essential for pin formation.
Why Are My Mushrooms Not Pinning?
Mushrooms may not pin due to incorrect humidity, temperature, or light conditions. Poor substrate quality can also hinder pinning.
Conclusion
Mastering mushroom pinning can significantly boost your cultivation success. With patience and proper techniques, you will achieve fruitful results. Stay committed, and soon you’ll enjoy a bountiful mushroom harvest. Keep experimenting and learning to perfect your skills. Happy growing and may your mushroom journey be rewarding and fruitful!